
Creating a Bootable USB Drive for Windows 11: A Comprehensive Guide
Related Articles: Creating a Bootable USB Drive for Windows 11: A Comprehensive Guide
Introduction
With great pleasure, we will explore the intriguing topic related to Creating a Bootable USB Drive for Windows 11: A Comprehensive Guide. Let’s weave interesting information and offer fresh perspectives to the readers.
Table of Content
- 1 Related Articles: Creating a Bootable USB Drive for Windows 11: A Comprehensive Guide
- 2 Introduction
- 3 Creating a Bootable USB Drive for Windows 11: A Comprehensive Guide
- 4 Closure
Creating a Bootable USB Drive for Windows 11: A Comprehensive Guide
Installing Windows 11 on a new computer or performing a clean install on an existing system often requires creating a bootable USB drive. This process, commonly referred to as "burning an ISO to USB," involves transferring the Windows 11 installation files from an ISO image to a USB drive, making it a self-contained installation medium. This guide provides a comprehensive explanation of the process, outlining its importance, benefits, and potential challenges.
Understanding the Importance of a Bootable USB Drive
A bootable USB drive for Windows 11 serves as a crucial tool for several scenarios:
- Clean Installation: When performing a clean install, the bootable USB drive allows you to erase the existing operating system and install Windows 11 from scratch. This is often recommended to resolve performance issues or remove unwanted software.
- Upgrading from an Older Operating System: If your current operating system does not meet the minimum requirements for Windows 11, you can use a bootable USB drive to upgrade to the latest version.
- Repairing Windows: In cases where Windows 11 encounters severe errors or malfunctions, a bootable USB drive can be used to access recovery options and attempt to repair the operating system.
- Dual Booting: If you wish to install Windows 11 alongside your existing operating system, a bootable USB drive enables you to create a dual-boot configuration, allowing you to choose which operating system to use at startup.
Benefits of Creating a Bootable USB Drive
- Convenience and Portability: A bootable USB drive offers a portable and convenient solution for installing or repairing Windows 11 on multiple computers.
- Flexibility: It provides flexibility in choosing the installation method, allowing you to install Windows 11 on a computer without an optical drive or to perform a clean installation without needing to download the ISO image again.
- Troubleshooting Tool: The bootable USB drive serves as a valuable troubleshooting tool, allowing you to access recovery options and potentially fix system issues.
- Faster Installation: In some cases, installing Windows 11 from a USB drive can be faster than installing from a DVD.
The Process of Burning an ISO to USB
The process of creating a bootable USB drive for Windows 11 involves three main steps:
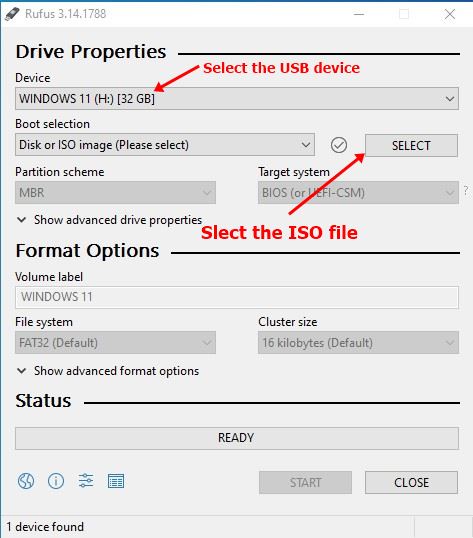
Step-by-Step Guide: Using Rufus to Create a Bootable USB Drive
Rufus is a free, lightweight, and highly recommended tool for creating bootable USB drives. Here’s a detailed guide:
Step-by-Step Guide: Using the Windows 11 Media Creation Tool
The Windows 11 Media Creation Tool is another popular option for creating bootable USB drives. Here’s how to use it:
Potential Challenges and Troubleshooting
While creating a bootable USB drive is generally straightforward, certain challenges might arise. Here are some common issues and their solutions:
- Incorrect USB Drive: Ensure you select the correct USB drive in the tool you are using.
- Insufficient Storage: Make sure the USB drive has enough storage space for the Windows 11 ISO image.
- Formatting Errors: If you encounter formatting errors, try using a different USB drive or a different tool.
- Boot Order Settings: After creating the bootable USB drive, you may need to adjust the boot order in your BIOS settings to prioritize booting from the USB drive.
- Compatibility Issues: Ensure the USB drive is compatible with your computer’s BIOS. Some older computers might not support booting from USB drives.
FAQs about Creating a Bootable USB Drive for Windows 11
1. What are the minimum system requirements for Windows 11?
To install Windows 11, your computer must meet certain minimum system requirements. These include a 64-bit processor, at least 4GB of RAM, 64GB of storage space, a compatible graphics card, and a UEFI firmware with Secure Boot enabled.
2. Can I use a USB drive formatted with a different file system?
While NTFS is the recommended file system for creating a bootable USB drive for Windows 11, other file systems like FAT32 might be used. However, it’s important to note that FAT32 has a file size limit, which might prevent the installation process from completing successfully.
3. Can I use a USB drive with a smaller capacity than the ISO image size?
No, the USB drive must have enough storage space to accommodate the entire Windows 11 ISO image.
4. What if the USB drive is not recognized by my computer?
If your computer does not recognize the USB drive, try connecting it to a different USB port or restarting your computer. If the issue persists, the USB drive might be faulty.
5. Can I use the same USB drive for multiple installations?
Yes, you can use the same USB drive for multiple installations, but it is recommended to format the drive before each installation to ensure a clean and efficient process.
Tips for Creating a Bootable USB Drive for Windows 11
- Use a High-Quality USB Drive: Opt for a high-quality USB drive with a fast read and write speed for a smoother installation process.
- Format the USB Drive: Before creating the bootable drive, format the USB drive using the appropriate file system (NTFS).
- Verify the Bootable Drive: After creating the bootable USB drive, verify that it is bootable by attempting to boot your computer from it.
- Back Up Important Data: Before installing Windows 11, back up all important data to an external drive or cloud storage service.
- Keep the USB Drive Safe: Once you’ve created the bootable USB drive, keep it in a safe place as you might need it for future installations or repairs.
Conclusion
Creating a bootable USB drive for Windows 11 is a crucial step for installing, upgrading, or repairing the operating system. By following the detailed instructions and troubleshooting tips provided in this guide, you can successfully create a bootable USB drive and utilize it for various purposes. It is essential to understand the importance of a bootable USB drive and its benefits in ensuring a smooth and efficient Windows 11 installation experience.


![How to Make Windows 11 Bootable USB Drive [Step-by-Step Guide] - MiniTool Partition Wizard](https://www.partitionwizard.com/images/uploads/2021/07/windows-11-bootable-usb-drive-thumbnail.jpg)
Closure
Thus, we hope this article has provided valuable insights into Creating a Bootable USB Drive for Windows 11: A Comprehensive Guide. We hope you find this article informative and beneficial. See you in our next article!
2025